Date Archives July 2025

Creamy Garlic Parmesan Pasta (Baked Perfection!)

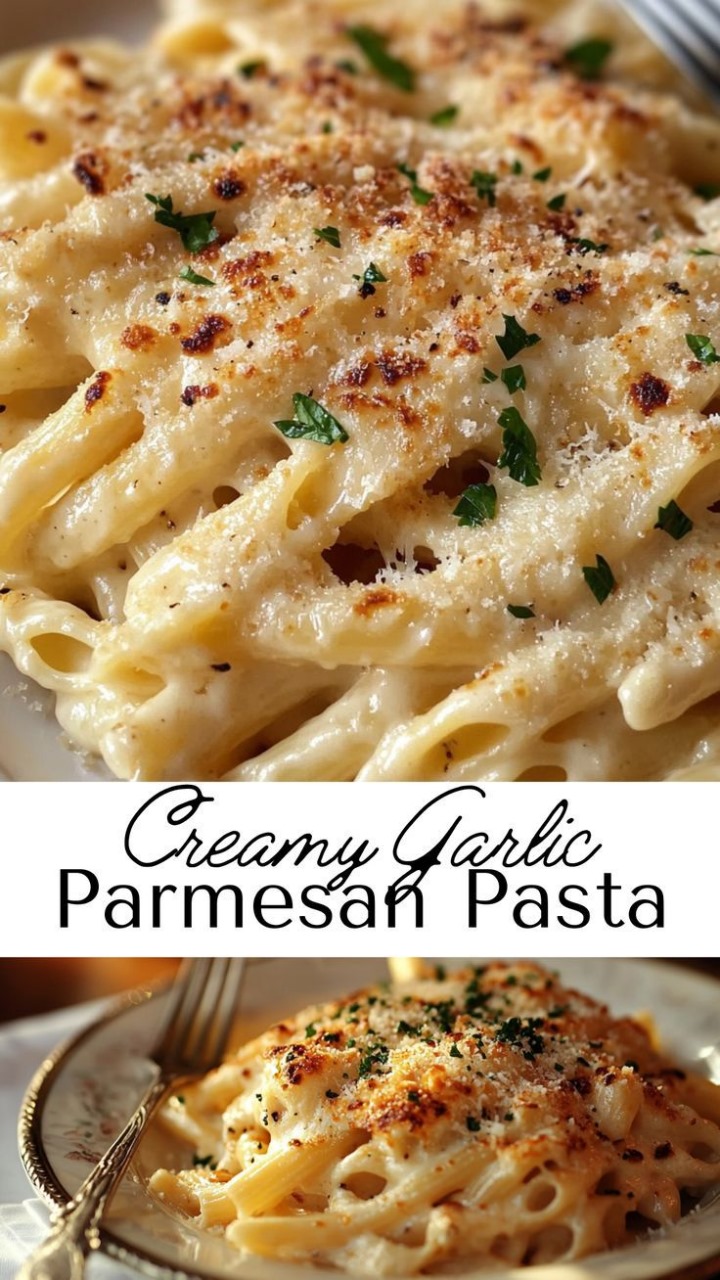
Warm, cheesy, and comfortingly rich — this Creamy Garlic Parmesan Pasta is the kind of dish that brings everyone back to the table. Whether it’s a cozy weeknight dinner or a dish you want to impress guests with, this baked pasta is your golden ticket to creamy, dreamy bliss.


Why You’ll Fall in Love With This Recipe ❤️

This isn’t just any pasta recipe — this is the kind of dinner that feels like a warm hug. The kind that fills your kitchen with the scent of roasted garlic, bubbling cream, and toasted cheese.

  • Ultra-creamy with a rich garlic Parmesan sauce that clings to every noodle
  • Golden and bubbly from a quick bake under the broiler
  • Minimal ingredients, big reward
  • Comfort food at its finest — perfect for any night of the week

It’s like Alfredo… but bolder, creamier, and with that irresistible hint of oven-kissed cheese on top.


Ingredients You’ll Need 🧺

To bring this creamy masterpiece to life, you only need a handful of simple pantry staples:

Pasta:

  • 12 oz penne (or rigatoni, ziti, or your favorite tube pasta)

Sauce:

  • 3 tablespoons unsalted butter
  • 5–6 garlic cloves, finely minced
  • 2 tablespoons all-purpose flour
  • 2 cups whole milk (warm)
  • 1 cup heavy cream
  • 1 ½ cups freshly grated Parmesan cheese
  • Salt & freshly ground black pepper, to taste
  • ½ teaspoon Italian seasoning (optional)

Topping:

  • ¼ cup Parmesan cheese, extra for broiling
  • Chopped parsley, for garnish

Let’s Cook! 👩‍🍳 Step-by-Step Instructions

Step 1: Cook the Pasta

Bring a large pot of salted water to a boil and cook pasta just until al dente (firm to the bite). Drain and set aside. Don’t overcook — the pasta will finish in the oven!

Step 2: Make the Creamy Garlic Sauce

In a large skillet over medium heat, melt the butter. Add in minced garlic and sauté for about 1 minute, until fragrant (don’t let it brown).

Whisk in the flour and cook for another 1–2 minutes to form a roux. Slowly pour in the warm milk, whisking constantly to avoid lumps. Then stir in the cream.

Let it simmer gently until it begins to thicken (about 3–5 minutes), then stir in the Parmesan cheese and season with salt, pepper, and Italian seasoning.

Pro Tip: Use freshly grated Parmesan for the smoothest melt — pre-shredded can clump.

Step 3: Combine Pasta & Sauce

Toss the cooked pasta into the sauce and stir until evenly coated. It should be thick and creamy and look like something out of a dream.

Step 4: Broil Until Bubbly

Pour the pasta into a lightly greased baking dish. Sprinkle with a generous layer of extra Parmesan. Place under the broiler on high for 2–4 minutes, watching closely — until the top is golden brown and bubbly.

Step 5: Garnish & Serve

Top with fresh chopped parsley and serve hot!


What to Serve With This Pasta 🍷

  • A crisp Caesar salad or simple arugula lemon salad
  • Toasted garlic bread or crusty sourdough
  • Grilled chicken or shrimp for extra protein
  • A glass of cold white wine or sparkling water with lemon

Storage & Reheating 🧊

Store leftovers in an airtight container in the fridge for up to 3 days.

To reheat, splash with a bit of milk or cream and warm in a skillet over medium-low heat, or microwave gently. The sauce thickens in the fridge but loosens beautifully with a touch of liquid.


Tips for Creamy Pasta Success 💡

  • Use warm milk to prevent your sauce from seizing.
  • Fresh garlic is a must — garlic powder just won’t give the same depth.
  • Don’t skip the broil — it gives that incredible golden, cheesy crust.
  • Make it vegetarian or serve it with your favorite proteins — it’s flexible and forgiving.

Frequently Asked Questions (FAQs)

Can I use half-and-half instead of heavy cream?
Yes! The sauce will be slightly lighter but still delicious.

What’s the best cheese for this recipe?
Freshly grated Parmesan or Pecorino Romano are ideal. Don’t use the shaker bottle kind!

Can I make this ahead?
Absolutely! Prep the sauce and pasta, assemble it, and refrigerate until ready to bake. Add a splash of cream before broiling.

Can I freeze it?
This pasta is best fresh, but if needed, freeze it before broiling. Reheat and broil when ready to eat.


Crispy Parmesan Cauliflower Bites

A Golden Bite of Comfort with a Cheesy Crunch Worthy of Devotion


The Humble Vegetable That Surprised Me

Cauliflower never used to get me excited. To be honest, it was the vegetable I’d ignore at the grocery store, the one that seemed destined for bland steaming or forgettable purees. But one late night in a tiny, dimly lit kitchen during my first year as a line cook, I watched the sous chef whip up something unexpected—battered florets tossed in grated parmesan, roasted until golden, then served with a lemony aioli that stopped everyone mid-conversation. One bite, and the lowly cauliflower was reborn.

That memory followed me for years. Through kitchens where time was tight and creativity tighter, this dish became my quiet rebellion: proof that even the most overlooked ingredient could be transformed with fire, fat, and just the right touch of salt.


Why These Crispy Parmesan Cauliflower Bites Deserve a Place at Your Table

These aren’t your average roasted veggies. They’re crunchy, cheesy, golden brown on the edges, and tender inside—the kind of snack that disappears before the tray cools. The crisp exterior comes from a blend of panko breadcrumbs and parmesan cheese, toasted in the oven to perfection.

No deep fryer. No soggy results. Just the kind of crunch you’d expect from something far more indulgent.

Whether you’re serving them as an appetizer, tossing them in a grain bowl, or just snacking straight from the pan, they deliver in flavor and texture. This is comfort food with edge and elegance—and it’s vegetarian, gluten-adaptable, and wildly addictive.


Let’s Break Down the Flavors (And the Secrets Behind Them)

1. Cauliflower

Fresh is key. Choose a head that’s tight, pale, and heavy for its size. I break mine into small-to-medium florets—not too tiny, or they dry out. You want nooks and crannies to hold onto the parmesan.

Chef Tip: After washing, make sure your florets are completely dry. Moisture is the enemy of crispiness.

2. Parmesan Cheese

Skip the shelf-stable shaker. Use freshly grated Parmigiano-Reggiano or a high-quality hard cheese. It crisps in the oven and adds that salty, nutty backbone.

3. Panko Breadcrumbs

Panko is lighter and airier than traditional breadcrumbs, which means maximum crunch. Mix it with the cheese and a few herbs to make a coating that sings when it hits the heat.

4. Olive Oil (or Avocado Oil)

You need just enough to coat the cauliflower—not drown it. A light drizzle helps the crust adhere and promotes even browning.

5. Seasonings

Salt, pepper, garlic powder, paprika, and a hint of thyme or Italian herbs round out the flavor. Don’t overdo it—the cheese does a lot of heavy lifting.


Step-by-Step: How to Make Crispy Parmesan Cauliflower Bites

“These bites are made in the oven, but feel fried—without the mess.”

Step 1: Preheat with Purpose

Set your oven to 425°F (220°C). A hot oven is essential to build that golden crust. Line a rimmed baking sheet with parchment paper for easy cleanup.

Step 2: Prep the Cauliflower

Cut your head of cauliflower into evenly sized florets. Dry them thoroughly with paper towels—this matters more than you think.

Step 3: Make Your Crust

In a bowl, combine:

  • 1 cup panko breadcrumbs
  • ½ cup finely grated parmesan cheese
  • 1 tsp garlic powder
  • ½ tsp smoked paprika
  • Salt and black pepper to taste
  • Optional: ½ tsp dried thyme or parsley

Step 4: Coat the Florets

Set up a two-bowl station:

  • In one bowl, beat 2 eggs (or use a mix of olive oil + Dijon mustard for a vegan version)
  • In the other, your breadcrumb-cheese mixture

Dip each floret into the egg, then into the crust, pressing gently to help it adhere. Place on the baking sheet with space between them.

Step 5: Bake to Golden Glory

Roast for 25–30 minutes, flipping halfway through. You’ll know they’re done when the edges are deep golden brown and the centers are fork-tender.

Don’t rush the flip—let the first side crisp fully before turning, or the crust may fall off.


What to Serve Them With

These bites are versatile:

  • Lemon-garlic aioli (a must for dipping)
  • Spicy marinara or buffalo sauce
  • Tucked into a warm pita with tzatziki
  • On top of a grain bowl with quinoa, feta, and greens
  • Paired with a crisp white wine like Sauvignon Blanc or a bubbly hard cider

Variations Worth Exploring

Gluten-Free Version
Use gluten-free panko (available at most grocers) or crushed rice cereal for a satisfying crunch.

Vegan Adaptation
Skip the egg and use a blend of plant-based milk and Dijon mustard to coat before breading. Use a vegan parmesan substitute or finely ground cashews with nutritional yeast.

Add a Kick
Toss in red pepper flakes or a bit of cayenne to the crust mixture.

Make It a Meal
Serve the bites over farro, roasted red peppers, and kale, drizzled with tahini-lemon dressing for a full lunch-worthy bowl.


Real Talk: A Dish That Grows on You

I’ve made these for carnivores, skeptics, kids, and chefs—and the reaction is always the same: surprised delight. No one expects cauliflower to taste this good, this indulgent, this snackable.

I’ve seen people crowd the tray before it hits the table. I’ve watched cauliflower haters go back for seconds. And that, to me, is a culinary victory more satisfying than any flambé or soufflé.

So if you’ve got a head of cauliflower and an oven, you’ve got something worth remembering.


Crispy Parmesan Cauliflower Bites Recipe Card

Serves: 4 as an appetizer
Prep Time: 15 minutes
Cook Time: 30 minutes
Total Time: ~45 minutes

Ingredients:

  • 1 large head cauliflower, broken into florets
  • 1 cup panko breadcrumbs
  • ½ cup freshly grated parmesan cheese
  • 2 eggs, beaten (or plant-based milk + Dijon for vegan)
  • 1 tsp garlic powder
  • ½ tsp smoked paprika
  • Salt & pepper to taste
  • 1–2 tbsp olive oil
  • Optional herbs: thyme, parsley

Instructions:

  1. Preheat oven to 425°F (220°C). Line a baking sheet with parchment.
  2. Dry cauliflower thoroughly. Prepare crust mixture in a bowl.
  3. Dip florets in egg, then in parmesan-panko coating.
  4. Arrange on the sheet, drizzle lightly with oil.
  5. Bake for 25–30 min, flipping once halfway through.
  6. Serve hot with your favorite dip.

A Final Note from the Cutting Board

I never thought cauliflower would become one of my favorite ingredients. But these bites remind me that cooking is about transformation—not just of ingredients, but of assumptions. They’re humble, unassuming, and wildly rewarding.

So next time you pass by that pale, knobby head in the produce aisle, grab it. Give it heat, give it cheese, give it a second chance.

And maybe, just maybe, it’ll surprise you too.

Ask ChatGPT

Sheet Pan Sausage and Sweet Potatoes with Honey Garlic Sauce


The Warm Kitchen on a Cold Tuesday

I’ll never forget that night. The air outside had that late-autumn bite, the kind that seeps through your sleeves and into your bones before you even realize you’re cold. I’d just come home from a double shift—sore feet, short temper, and a refrigerator that stared back at me with a familiar, almost mocking emptiness.

But there was a coil of smoked kielbasa, a few slightly bruised sweet potatoes left from the farmer’s market, and half a bulb of garlic resting like a promise on the counter. I didn’t have the energy for anything fancy. No braising. No multiple pans. Just one sheet tray and a hunger for something soul-soothing.

I tossed everything together with a quick honey-garlic glaze I’d memorized years ago in culinary school—back when I thought French cuisine was the pinnacle of life and didn’t yet understand how transformative humble ingredients could be. Forty-five minutes later, the kitchen smelled like warmth and resolution. And I learned that comfort doesn’t always come in Michelin stars. Sometimes, it’s just roasted sausage and sweet potatoes on a single pan.


The Sweet Science of Simplicity: What Makes This Dish Unique

Sheet pan sausage and sweet potatoes with honey garlic sauce isn’t trying to impress your boss or win awards—it’s here to feed your soul and fill your home with the kind of smells that make people linger in doorways. What makes this dish unique is the emotional precision behind its ease.

The balance of smoky fat from the sausage melting into the caramelizing sweet potatoes… that whisper of honey wrapping around the garlic like a winter scarf… and the way everything crisps and concentrates under high heat—it’s poetry written in grease and gold.

And the best part? It’s all done on one pan. No mess. No juggling. No excuses.


Let’s Talk Ingredients:

The Everyday Stars, According to a Tired Chef Who’s Been There

1. Smoked Sausage
You want something with character—kielbasa, andouille, or even a good local bratwurst. This isn’t the place for chicken apple sausage, unless you want a sweeter, gentler profile (and that’s okay too). The fat rendered from these links bastes everything around it. I once made this with lamb merguez and nearly cried. It was that good.

2. Sweet Potatoes
Choose firm, unblemished ones. The orange flesh caramelizes beautifully under heat, especially if you cut them into uniform wedges or chunks—not too small or they’ll fall apart. And yes, you can leave the skin on. That’s where the real flavor lives.

3. Red Onion
Not optional. It brings acid, sweetness, and that barely-burnt edge that makes the dish feel kissed by fire. Slice it thick so it doesn’t disappear.

4. Bell Peppers (Optional but Glorious)
If I have a red or yellow pepper lying around, I’ll throw it in. The brightness they bring helps balance the density of the sausage and potato.

5. The Sauce
Here’s where the dish earns its name:

  • Honey – For sweetness, obviously. But also for that sticky caramelization that gives your pan the kind of fond that makes you want to scrape it with your bare fingers.
  • Garlic – Use fresh. Grated or smashed works. Avoid the jarred stuff. Trust me.
  • Soy Sauce – For salt and umami. I use low-sodium Kikkoman.
  • Olive Oil – A drizzle to carry the flavor and coat the pan.
  • Red Pepper Flakes or Aleppo Pepper – Just a pinch. For heat, for intrigue.

6. Fresh Herbs (Optional Finish)
A sprinkle of chopped parsley or thyme at the end lifts the whole thing from “weeknight” to “rustic elegance.”


How to Make It (And Why You Shouldn’t Rush)

“Let the pan do the heavy lifting. Your job is just to set the stage.”

Step 1: Preheat and Prepare

Preheat your oven to 425°F (220°C). Hot enough to crisp, not so hot you burn the honey. Line a large half-sheet tray with parchment or foil if you’re lazy (like me, most nights).

Step 2: Cut Your Vegetables with Intention

Sweet potatoes should be cut into chunks about the size of a wine cork. Red onions into wedges. Don’t slice too thin—they’ll disappear under heat. Toss them in olive oil, salt, and a little black pepper. Spread them on the tray like they’re auditioning for a movie—give them space.

Pro Tip: Crowded trays steam. Spaced trays roast. There’s a difference, and it’s flavor.

Step 3: Slice Your Sausage

Cut into thick coins or on the bias for more surface area. Don’t add it yet—we’ll roast the veg a bit first to give them a head start.

Step 4: Roast, Pause, Toss

Roast the veggies alone for about 20–25 minutes. You’ll start seeing the edges blister and turn amber. Now, pull out the tray and add the sausage. Pour over half of the honey garlic glaze, and gently toss everything.

Back in the oven for another 20–25 minutes, until the sausage is browned and everything’s sticky, sweet, and singed in just the right places.

Step 5: The Glaze Finale

In the last 5 minutes, drizzle on the rest of the sauce and crank the oven to broil for 2 minutes (watch closely!). That’s your caramel finish.

Mistake to Avoid: Don’t add all the sauce at once or the sugars will burn before the potatoes are done.


Substitutions, Tweaks & Troubleshooting

“Can I use something besides sweet potatoes?”
Yes. Butternut squash works. Even Yukon golds if that’s what you have. Just keep in mind they won’t caramelize quite the same.

“What if I don’t eat pork?”
Use chicken sausage, turkey kielbasa, or a plant-based sausage like Field Roast. Just know that you may need extra oil for moisture.

“Is a sheet pan enough, or should I use a Dutch oven?”
Stick with the sheet pan. The flat surface area gives you crisp. A Dutch oven will steam it.

“What can I serve this with?”

  • A simple green salad with lemon vinaigrette
  • Warm crusty bread for mopping up sauce
  • Crisp Riesling or a dry hard cider—both play well with the sweetness and spice.

Why This Dish Still Matters to Me

I’ve made this dish in a dozen kitchens—my old Brooklyn apartment with the barely-working oven, a cabin in Vermont with no internet, and most recently, in my parents’ suburban kitchen while they danced in the living room to Sam Cooke. It’s become one of those dishes that shows up when you need comfort, not applause.

It’s not showy. It’s not trendy. But it shows up—and that’s more than I can say for most things in life.

I once made it for a friend going through a divorce. We didn’t talk much while we ate, just listened to the crunch of the caramelized edges and let the warmth speak for us. That’s the kind of recipe this is.

So here it is. From my table to yours.

No pretense. Just flavor, memory, and fire.


Recipe Card: Sheet Pan Sausage and Sweet Potatoes with Honey Garlic Sauce

Serves: 4
Prep Time: 15 minutes
Cook Time: 45 minutes
Total Time: ~1 hour

Ingredients:

  • 1 lb smoked sausage (kielbasa or andouille), sliced
  • 2 medium sweet potatoes, cut into chunks
  • 1 large red onion, cut into wedges
  • 1 bell pepper (optional), sliced
  • 2 tbsp olive oil
  • Salt and black pepper, to taste

For the Honey Garlic Sauce:

  • 3 tbsp honey
  • 3 cloves garlic, grated or minced
  • 1 tbsp soy sauce (low sodium)
  • 1 tbsp olive oil
  • ½ tsp red pepper flakes (or to taste)

Optional Garnish:

  • Chopped parsley or thyme

Instructions:

  1. Preheat oven to 425°F (220°C). Line a sheet tray with parchment or foil.
  2. Toss sweet potatoes, onions, and peppers in olive oil, salt, and pepper. Roast for 20–25 min.
  3. Add sausage to the tray. Pour half the sauce over everything and toss gently.
  4. Return to oven and roast another 20–25 min, until caramelized and golden.
  5. Drizzle on remaining sauce, broil for 2 minutes to finish.
  6. Garnish with herbs, serve hot.

A Final Note From My Kitchen

If you make this dish, I hope it becomes more than just a recipe. I hope it becomes a moment—a way to care for someone (maybe even yourself) when words fall short and time is short, too.

Because sometimes, all you need is a hot oven, a good sausage, and a sheet pan full of healing.

Bon appétit.

Ask ChatGPT

Mediterranean Chicken Gyros: A Delicious Recipe for Flavorful Meals


A Midnight Meal in Santorini: Where My Love for Gyros Began

I remember it vividly. Midnight in Santorini. The kind of wind that whips salt through your hair and carries laughter down whitewashed alleys. I had just finished a long shift helping out in a tucked-away taverna—hands blistered from slicing lamb, my apron still warm from the grill. My Greek was terrible, but my hunger spoke clearly.

I stumbled into a tiny gyro stand near Oia’s caldera edge. The old man behind the counter barely looked up—he just reached for a flatbread, a handful of marinated chicken, and a dollop of garlicky tzatziki. The wrap came together like a lullaby—warm, messy, fragrant. One bite and I swear time slowed down. That single gyro, eaten sitting on a stone wall beneath stars, taught me everything I now chase in food: warmth, soul, and the quiet language of spice and smoke.

This Mediterranean Chicken Gyros recipe is my love letter to that night. Not just the food—but the feeling of it. The heat of the chicken, the brightness of lemon, the cool slap of cucumber yogurt. It’s a recipe that’s fed tired line cooks in my kitchen, calmed my nerves before big service nights, and now, I hope, finds its way into your own memory.


Ingredients: The Cast of Characters in Every Great Gyro

Here’s the thing about gyros—they’re simple, but not plain. Every ingredient is essential, each with a story. As a chef, I’ve come to learn that treating even the most familiar components with reverence makes all the difference.

✅ Boneless, Skinless Chicken Thighs

Forget breasts—thighs are king. They’re juicy, forgiving, and love to bathe in marinades. When seared hot, they crisp beautifully without drying out. If you can, source organic or free-range. The flavor will thank you.

Substitution Tip: In a pinch, chicken breast will do—but marinate it longer and cook it gently.

✅ Greek Yogurt

Used twice in this dish—once in the marinade and again in the tzatziki. I use Fage Total 5% for its luscious creaminess. It tenderizes meat and balances the punchy garlic.

✅ Fresh Lemon Juice and Zest

Don’t skip the zest. It’s not just for looks—it’s aromatic, floral, and ties the whole dish together. Use a Microplane for best results.

✅ Extra Virgin Olive Oil

A workhorse and a perfume. Choose cold-pressed Greek EVOO if you can find it. I keep a bottle of Kalamata DOP oil just for recipes like this.

✅ Garlic, Crushed

Raw garlic bites. Crushed garlic sings. Smash it with the side of your knife, let it mellow with salt. This is where your marinade wakes up.

✅ Dried Oregano (Greek-style)

There’s oregano, and then there’s Greek oregano—darker, woodier, more assertive. I always crumble it between my palms to release the oils.

✅ Smoked Paprika

Not traditional, but I like to add a whisper for smoky depth. Just a pinch. It rounds out the citrus.

✅ Pita or Flatbread

Skip the store-bought cardboard if you can. Try warm, pillowy naan or homemade pitas pan-toasted in olive oil. You want something flexible yet strong enough to hold saucy joy.

✅ Tzatziki

A sauce that deserves a spotlight. Greek yogurt, grated cucumber (squeezed dry), garlic, lemon juice, dill. Chill it well—it gets better with time.

✅ Tomato, Red Onion, and Lettuce

These are more than toppings. They bring crunch, sweetness, and coolness—like an edible exhale.


The Steps: Where Technique Meets Soul

Let me walk you through this like I would a new line cook, shoulder-to-shoulder at the prep table.


🕰 Step 1: The Marinade—Flavor in the Waiting

Whisk together:

  • 1 cup Greek yogurt
  • Juice + zest of 1 lemon
  • 3 garlic cloves, crushed
  • 2 tsp dried oregano
  • 1 tsp kosher salt
  • ½ tsp cracked black pepper
  • 2 tbsp EVOO
  • Optional: ½ tsp smoked paprika

Toss with 2 lbs chicken thighs. Get your hands in there. Feel the texture, make sure every fold of meat is coated. Cover and marinate at least 2 hours, preferably overnight.

💡 Chef’s Note: I once rushed this with a 30-minute soak and regretted it. Time = tenderness.


🔥 Step 2: High Heat, No Fear—Cooking the Chicken

Heat a cast iron skillet or grill pan over medium-high. No oil needed if the marinade had enough.

Sear chicken in batches (don’t crowd the pan!) for 5–6 minutes per side. Let a golden crust form before flipping.

Let rest 5 minutes, then slice into strips.

Don’t panic if the edges char a bit—that’s flavor. We’re not looking for bland boiled meat.


🥣 Step 3: The Tzatziki—Cooling the Fire

Mix:

  • 1 cup full-fat Greek yogurt
  • ½ cucumber, grated and squeezed dry
  • 1 garlic clove, minced
  • 1 tbsp lemon juice
  • 1 tbsp chopped fresh dill
  • Salt to taste

Let it chill. Tzatziki’s a quiet hero—it doesn’t need the spotlight but always steals the show.


🌯 Step 4: Assembly—The Moment of Truth

Warm your pita. Lay down a swoosh of tzatziki. Add sliced chicken, tomato wedges, thin red onion rings, and shredded lettuce.

Roll. Wrap. Hold with parchment or foil if needed. Then—take a bite.

And listen. That’s not just a crunch. It’s a song.


Serving Suggestions: What to Sip, Scoop, or Serve on the Side

Drink Pairings:

  • White Wine: Assyrtiko or Sauvignon Blanc
  • Beer: A crisp pilsner or citrusy pale ale
  • Non-Alcoholic: Cucumber-mint lemonade or chilled ayran

Side Dishes:

  • Orzo salad with feta and olives
  • Roasted red pepper hummus + warm pita chips
  • Lemon-herb couscous
  • Pickled turnips (for a Levantine twist)

Variations:

  • Vegetarian: Swap chicken for grilled halloumi or marinated portobellos
  • Gluten-Free: Serve gyro fillings over quinoa or rice bowls
  • Spicy: Add harissa to the marinade or sriracha to the tzatziki

Common Questions, Answered From Experience

❓What makes this dish unique?

It’s not just a wrap—it’s an emotional, cultural vessel. A gyro is texture, contrast, and memory all folded into warm bread. It bridges freshness with depth, speed with soul.

❓Can I use chicken breast instead of thighs?

Yes—but marinate longer, don’t overcook, and slice thinly against the grain. Still good, but not as luscious.

❓Do I need a special tool like a tagine or rotisserie?

Nope. A hot skillet, patience, and attention are your tools. Flavor comes from handling with care, not gadgets.

❓Can I meal prep this?

Absolutely. Store chicken, tzatziki, and toppings separately. Reheat the chicken gently and assemble just before eating.


One Last Thought: Why I Still Make These Every Month

There are dishes you cook once, and then there are the ones that become your rhythm.

Mediterranean Chicken Gyros live in my house like an old friend. Reliable. Joyful. Every time I make them—whether for a weeknight dinner or a backyard get-together—I think of that night in Santorini. I remember the man who didn’t say a word, but fed me better than any five-star chef ever could.

That’s the power of food made with love. Not complexity, not precision—heart.

And I hope that when you make these, whether standing barefoot in your kitchen or serving them to people you love, you feel a little of that too.


Go slow. Taste as you go. Cook like someone’s going to remember this meal forever.

From my heart to your plate,
— Chef Elias

Rich, Creamy Marry Me Chicken Soup: The Kind of Bowl That Changes Things

It was snowing sideways the first time I made this soup. I remember because the windows in my Brooklyn walk-up rattled like they were about to give in, and my old radiator was humming its inconsistent lullaby in the background. I was barefoot in the kitchen — a habit I can’t seem to shake — stirring a pot of what was supposed to be basic chicken soup.

But then something happened.

Maybe it was the loneliness of that late February afternoon, or maybe it was the sheer hunger for something that felt like a hug. Whatever it was, I didn’t stop at broth and chicken. I added cream. I added sun-dried tomatoes. I let garlic melt into butter, let thyme and red pepper flakes whisper their heat into the pot. And then, at the very last minute, I tossed in a parmesan rind I’d been saving — and suddenly, what was supposed to be a simple soup became the soup.

A soup that could start something. Or save something. A soup worthy of the name:

Marry Me Chicken Soup.


Why This Soup Feels Like Falling in Love

There’s something inherently hopeful about soup — the slow simmer, the quiet build of flavor, the way time transforms ingredients into something far greater than their parts. But this isn’t your average creamy chicken soup recipe. This one has depth. It has story. It has that velvety finish that lingers long after the bowl is empty.

And like all great love stories, it starts simply… and ends beautifully complicated.

This soup wraps around your ribs. It feeds something deeper than hunger. It’s comfort food for fall, winter, breakups, proposals, snowstorms, and those weird in-between Tuesdays when you don’t know what you need — but you know it’s warm, rich, and honest.


The Ingredients that Make It Unforgettable

Olive Oil + Butter

You need both. Olive oil for that subtle fruitiness, butter for the creamy body. Together they build the base of flavor — especially when used to slowly sweat the garlic and shallots.

Garlic and Shallots

Forget yellow onions for a minute. Shallots are softer, sweeter, more romantic. Mince them fine and let them melt — they don’t shout, they whisper. Garlic, too, should be sliced thin and sautéed until golden, not browned. Burnt garlic? That’s heartbreak. Take your time.

Boneless Chicken Thighs

Yes, thighs. Always thighs. They’re richer, juicier, and far more forgiving than breast meat. You can simmer them longer, and they’ll still fall apart like confessions in candlelight. Poach them gently in the broth, then shred.

Tip from experience: Don’t rush the shredding. Let the meat rest a few minutes out of the pot — then use two forks or your fingers. The texture matters.

Sun-Dried Tomatoes

This is the secret. They bring tang, umami, and a chewy intensity that no fresh tomato can replicate. Get the ones packed in oil, drain them lightly, then chop them into thin ribbons. They’re not just flavor — they’re memory.

Fresh Thyme and Red Pepper Flakes

Fresh thyme adds this warm, herbal backbone. Red pepper flakes? Just a pinch. You want warmth, not heat. This soup should kiss your tongue, not slap it.

Heavy Cream + Chicken Stock

Balance is everything. Use a good homemade or low-sodium chicken stock (boxed is fine if you doctor it up with aromatics). Heavy cream softens the acidity and adds that signature richness.

Parmesan Rind + Grated Parm

The rind goes into the pot early, like a love letter tucked into a suitcase. It melts slowly, releasing salty, nutty goodness. Then just before serving, a handful of freshly grated parmesan ties it all together.


How to Make Rich, Creamy Marry Me Chicken Soup

1. Build Your Base
In a Dutch oven or heavy-bottomed pot, warm 2 tbsp olive oil and 2 tbsp unsalted butter over medium heat. Add 4 minced shallots and 4 cloves of thinly sliced garlic. Sauté gently for 4–5 minutes, until soft and translucent.

Smell that? That’s your foundation.

2. Layer in Flavor
Add 1½ tsp fresh thyme, a pinch of red pepper flakes, and ½ cup chopped sun-dried tomatoes. Stir for another 2 minutes. Let those oils release. Let them speak.

3. Add Chicken and Stock
Place 1½ lbs boneless chicken thighs directly into the pot. Pour in 4 cups good-quality chicken stock. If you have a parmesan rind, now’s the time to add it. Bring to a gentle simmer.

Cover partially and cook for 20–25 minutes, until the chicken is fork-tender.

4. Shred and Return
Remove the chicken and let it rest. Shred it with forks or fingers. Meanwhile, remove the parmesan rind if it hasn’t dissolved completely. Return the chicken to the pot.

5. Cream It Up
Stir in 1 cup heavy cream. Simmer another 10 minutes, uncovered. Add salt and pepper to taste. The soup should be silky, never thin. If you need to thicken it more, mash a few spoonfuls of soup in a bowl and stir it back in.

6. Finish with Cheese and Herbs
Just before serving, stir in ½ cup freshly grated parmesan. Taste. Adjust. This is the moment to listen — the soup will tell you what it needs.

Garnish with more thyme, cracked pepper, maybe even a drizzle of chili oil if you’re feeling dangerous.


What to Serve with Marry Me Chicken Soup

This soup is a meal. But if you want accompaniments that elevate the experience:

  • Warm crusty sourdough with butter and flake salt
  • Roasted garlic crostini topped with whipped ricotta
  • Simple arugula salad with lemon and shaved fennel
  • Chardonnay or a soft Viognier — something with body and brightness
  • For non-drinkers: lightly sparkling water with rosemary or orange peel

Common Questions, Answered from My Own Kitchen

Q: What makes this soup different from regular creamy chicken soup?
A: It’s the sun-dried tomatoes, the parmesan, and the layering of herbs and aromatics. This isn’t just cream and chicken — it’s nuanced, balanced, and slightly bold. It feels fancy, without being fussy.

Q: Can I use chicken breasts instead of thighs?
A: You can, but be careful not to overcook them. They’re leaner, and they don’t absorb flavor the same way. If you’re going this route, poach them gently and reduce cook time by 5–7 minutes.

Q: How do I thicken the soup without flour?
A: Let it reduce slightly uncovered after adding cream. Or use a few mashed potatoes stirred in. Blending a small ladle of soup and adding it back also works beautifully.

Q: Can I make this ahead?
A: Absolutely. In fact, it gets better on day two. The flavors deepen overnight. Just reheat gently over low heat and stir often to keep the cream from separating.


Closing the Pot, Opening the Heart

There are a handful of dishes that have changed how I cook — and even how I live. This rich, creamy Marry Me Chicken Soup is one of them. Not because it’s complicated. Not because it’s trendy. But because it’s generous.

It gives. It comforts. It gathers.

I’ve made it for friends recovering from heartbreak, for my neighbor’s new baby meal train, and once — believe it or not — for a guy I’d only known for two dates. (Spoiler: He stayed for a third. And a fourth.)

This soup says: “I want to take care of you.”

Sometimes, that’s enough.

Buffalo Chicken Baby Bell Peppers: A Spicy Little Memory in Every Bite

It was late September — that in-between season when the light shifts just slightly, the air smells like dry leaves and worn leather, and everything feels like a half-finished goodbye to summer. That Sunday, my house was filled with the chaos of game day: a stack of mismatched coasters on the counter, half a case of pale ale chilling in the tub, and the low, constant hum of football commentary mixing with the hiss of something too close to burning.

Wings. I had planned wings.

Like any good former line cook with a reputation to uphold, I assumed I could fry 60 wings in rotation without losing a beat. But by the time the second quarter rolled around, the fryer had turned into a temperamental diva, spitting oil and demanding attention. Half the wings were limp and greasy, the other half fused into a chicken meteorite. I stood in that haze of vinegar steam and panic, staring into the bubbling oil like it had betrayed me.

So I improvised.

I’d seen something once — a caterer, years ago, stuffing sweet baby bell peppers with buffalo chicken dip and baking them till the tops blistered. No bones. No mess. Just one-bite flavor bombs.

That’s when this dish was born: Buffalo Chicken Stuffed Peppers, made miniature. Bite-sized. Bold. Brash. And somehow — more elegant than the usual wing pile.


Mini Peppers, Major Impact

You might think of mini bell pepper appetizers as the dainty cousins of traditional game day snacks. But these? These are the first to vanish at any gathering. They’re the culinary answer to that all-too-human question:

“How do I bring something that’s healthy-ish, craveable, and still feels indulgent?”

These baby bell peppers — with their natural sweetness and crisp bite — make the perfect vessel. They don’t wilt, they hold their shape, and when roasted, they cradle that spicy, creamy buffalo chicken filling like they were born for it.

Add melted cheese on top and you’ve got something dangerously addictive. These high-protein buffalo chicken bites pack all the heat, tang, and satisfaction of wings — without the napkin pile.


Let’s Talk Ingredients — From a Chef Who’s Burned a Few

Baby Bell Peppers

I always say: the best dishes start with what nature already perfected. Mini bell peppers are tender, vibrant, and naturally sweet. You want the reds and oranges — not just for color, but for flavor. Slice them lengthwise, remove the seeds, and you’ve got a little edible scoop.

If you see them in the pre-packed mesh bags at Costco or Trader Joe’s, grab them. They stay fresh longer than you’d expect — up to a week in the crisper — and they’re a blank canvas for creativity.

Shredded Chicken

This is where the real flavor lies. You can roast your own, but honestly? A good rotisserie chicken from your local market brings unbeatable depth. The dark meat melts into the filling, and the little roasted edges add umami you can’t fake.

Pro Tip: Always taste your chicken before adding it in. If it’s dry, warm it slightly and toss it with a little broth or melted butter before mixing.

Cream Cheese

Softened cream cheese gives you that dreamy, spreadable base. I always use Philadelphia because it’s smoother and more reliable — the texture doesn’t break or get gritty. Let it sit out for 30 minutes before mixing, or zap it for 10 seconds in the microwave (don’t overdo it or it’ll separate).

Frank’s RedHot Original

You already know. It’s the icon for a reason. The perfect balance of vinegar tang and chili warmth makes it the gold standard for buffalo chicken snacks. Mix it with cream cheese and chicken, and you’ve got an instant hit.

I’ve experimented with fancy fermented hot sauces, but for this? Stick to Frank’s.

Shredded Cheese

Sharp cheddar gives you the classic bite, while Monterey Jack melts into a silkier topping. I often use a blend — it gives you gooeyness and structure.

Feeling wild? Add a sprinkle of blue cheese crumbles right on top. It’s not for everyone, but if you’re a wing purist, it’ll hit the right nostalgic note.

The Spice Cabinet Crew

A touch of garlic powder and smoked paprika wakes everything up. The paprika, especially, adds this subtle whisper of campfire — smoky without overpowering. Salt and pepper to taste, always.


How to Make Buffalo Chicken Baby Bell Peppers (Without Losing Your Mind)

1. Preheat the oven
Set it to 400°F (205°C). Line a baking sheet with parchment or foil. If you’re a cast-iron skillet fan like me, that works beautifully too — it holds the heat and gives the bottoms a gentle roast.

2. Prep your peppers
Slice each mini bell pepper in half lengthwise. Use a small spoon to scrape out the seeds and membranes. Don’t worry about perfection — these are rustic, not fussy.

3. Make the filling

In a large bowl, combine:

  • 2 cups shredded rotisserie chicken
  • 4 oz softened cream cheese
  • ¼ cup Frank’s RedHot
  • ½ tsp garlic powder
  • ¼ tsp smoked paprika
  • Freshly ground black pepper
  • Optional: a handful of sharp cheddar or blue cheese crumbles

Mix until smooth and creamy. I like to use a fork for texture, but a hand mixer works if you’re going for that velvety buffalo chicken dip feel.

4. Fill the peppers

Use a teaspoon to scoop the mixture generously into each pepper half. Don’t pack it down too hard — just let it mound naturally.

5. Top with cheese

Sprinkle shredded cheddar or Monterey Jack over each piece. The cheese will bubble and brown in the oven, adding that golden crust you dream about.

6. Bake

Roast for 12–15 minutes, or until the cheese is melted and the peppers are just starting to soften at the edges. For a crispier top, broil on high for 2 minutes at the end — but watch like a hawk. Cheese goes from golden to tragedy in seconds.


Serving, Pairing, and the Power of Crunch

These are perfect warm, but they also hold beautifully at room temperature — making them ideal game day finger foods or picnic tray stars.

On the side:

  • Classic celery and carrot sticks
  • A ramekin of sour cream blended with blue cheese crumbles
  • A drizzle of ranch or yogurt dressing

Drink pairings that love spice:

  • A crisp, citrusy IPA
  • Dry Riesling or Grüner Veltliner
  • For non-alcoholic: sparkling water with lemon and a pinch of sea salt (yes, really — it cuts the heat and refreshes)

Variations Worth Exploring

  • Vegetarian version: Replace chicken with smashed chickpeas or jackfruit. Use extra seasoning for punch.
  • Low-carb lifestyle? You’re in luck. These are naturally low-carb and high in protein, no edits needed.
  • Tex-Mex remix: Add cumin, chopped jalapeños, and top with pepper jack. Serve with guac on the side.
  • Air fryer version: Cook stuffed peppers at 375°F for 8–10 minutes for an ultra-fast batch.

The Dish I Return to — Again and Again

There are dishes I’ve only made once, and then there are dishes like this — the ones that sneak into your repertoire quietly and never leave. These spicy little stuffed peppers have followed me from tailgate parties to baby showers, from weeknight dinners to midnight snacks.

And every time I make them, I remember that kitchen panic, the scent of scorched oil, and the relief of a rescue recipe that came not from a cookbook — but from instinct, hunger, and the need to feed people I love.

That’s the heart of cooking, isn’t it?

Not perfection. But presence.


Make these once. Burn them, maybe. Then try again.

They’re better the second time anyway.